Saturday, March 12, 2016

Farewell.


Hello Everyone! 
It is kind of weird writing this post...but it has been coming for a while. I started this blog as part of my project after returning from the Young Women's World Forum in 2010. I wanted to spread awareness about the Millennium Development Goals, sharing with others what amazing things were happening in Girl Guides of Canada, and empowering girls and young women to find something they are passionate about and try and make a difference in that. Overall I think I succeeded, which is a great feeling. I intended to keep this blog for 5 years, part of the plan from the beginning and now that time is up. I still love Girl Guides and it is a huge part of my life but it is no longer the most important part. I have grown into a completely different person, from a university student to a grade one teacher, and so many other things. I am not saying this is good-bye forever,  I might want to come back and blog some day, but for now I can say farewell. I hope you have enjoyed reading as much as I have enjoyed writing. 


Thank you for everything, 
Shannon 

Saturday, February 13, 2016

Dramatic Guide Meetings!

I have a very dramatic Guide unit. Not in the "they don't get along and cause a lot of problems" way, they are literally dramatic. They love putting on skits and plays and they would pick doing an improv game over any other activity 90% of the time. When the third year Guides said that they wanted to plan and run a meeting to complete the Performing Arts badge I thought, go for it!

 The third years decided that the unit would be divided into groups and plan, practice, and perform a skit with costumes and props. I had so many photos (as usual) of the meeting that I thought I would share them with you!  

This group was practicing being lost in the woods. 


Onto making masks, props, capes, and other costumes. I like that at the Guide level I can just put out the box of stuff and they just run with it! 


Another part of the badge is face painting, they went to town on this and I was actually pretty impressed with how realistic some of their face paint was!


This was definitely one of the more creative costumes from the meeting. She is dressed as a tree for the Lost in the Woods skit. I couldn't help but say, "I am Groot!" 

Note the dead bird on the tree branch...


The Superhero Skit was semi-improvised and I was pulled into an interrogation room demanding to know why I destroyed 500 cases of Girl Guide Cookies... It was a lot of fun and (un)fortunately it is all on video. 


The final product of the Lost in the Woods skit. 

I am so impressed by my group this year and I love being able to hand over the reins and let them lead activities at meetings. I hope that by letting them have the control of their own Guiding experience they will be confident, creative leaders in their lives. 

Tuesday, February 9, 2016

Make it Monday: Mason Jar Lanterns

At camp a few weekends ago we made lanterns to bring to our campfire out of mason jars. It was a really easy craft and they turned out well! 

You will need: a mason jar, a sponge brush, paint that is suitable for glass (I got the paint we used at Michael's), vinyl shelf liner, raffia, and a flameless candle. 


Step One: Draw a design on the vinyl shelf liner that you will cut out and stick onto the jar so that it will be protected from the paint. I chose to make a trefoil and after many failed attempts of trying to draw it free hand I went to my duffle bag, got out my word shirt, and traced it...


Step Two: Stick your sticker onto the jar. Make sure there are no bubbles in the sticker and all of the edges are completely stuck down. 


Step Three: Paint the jar. I used a dabbing technique so it wouldn't be streaky, but it doesn't really matter how you paint it on. 


Step Four: Let your jar dry for at least two hours with the vinyl stickers still on the jar. 

Step Five: Carefully peel off the vinyl sticker and add a raffia bow to make it look cute. :) Turn on the flameless candle and screw on the lid. 


That's it! I was really happy with how my lantern turned out and then I destroyed it for this photo. Do not put your lantern in the snow because the paint will come off. If I made this again I would probably add a sealant onto the lantern to protect it, but overall I think it was a pretty good craft.

Saturday, January 30, 2016

Winter Camp 2016!

The best part about Girl Guides for me is camping. I love being out in nature and seeing the beauty all around me, I love seeing the way the girls act when they can just be themselves, and I love being able to disconnect for a weekend and just have fun! In mid-January my Guide unit and my sisters' Pathfinder unit went to camp together and despite the fact that it was -38°C with the wind chill it was an awesome weekend! 

When we got there the entire building was covered with icicles. They were so long and it was almost magical how they were glistening in the moonlight. I had to take a picture of them before the girls hit them all down (it took about 5 minutes before they were all on the ground...)


Friday night we did the typical camp hat craft, the yarn toque! If you would like a step-by-step on this craft you can click here to see a previous post I made.


It wouldn't be a camp blog post without some nature shots! I loved the contrast of colours between the snow and the trees. It was so pretty! 


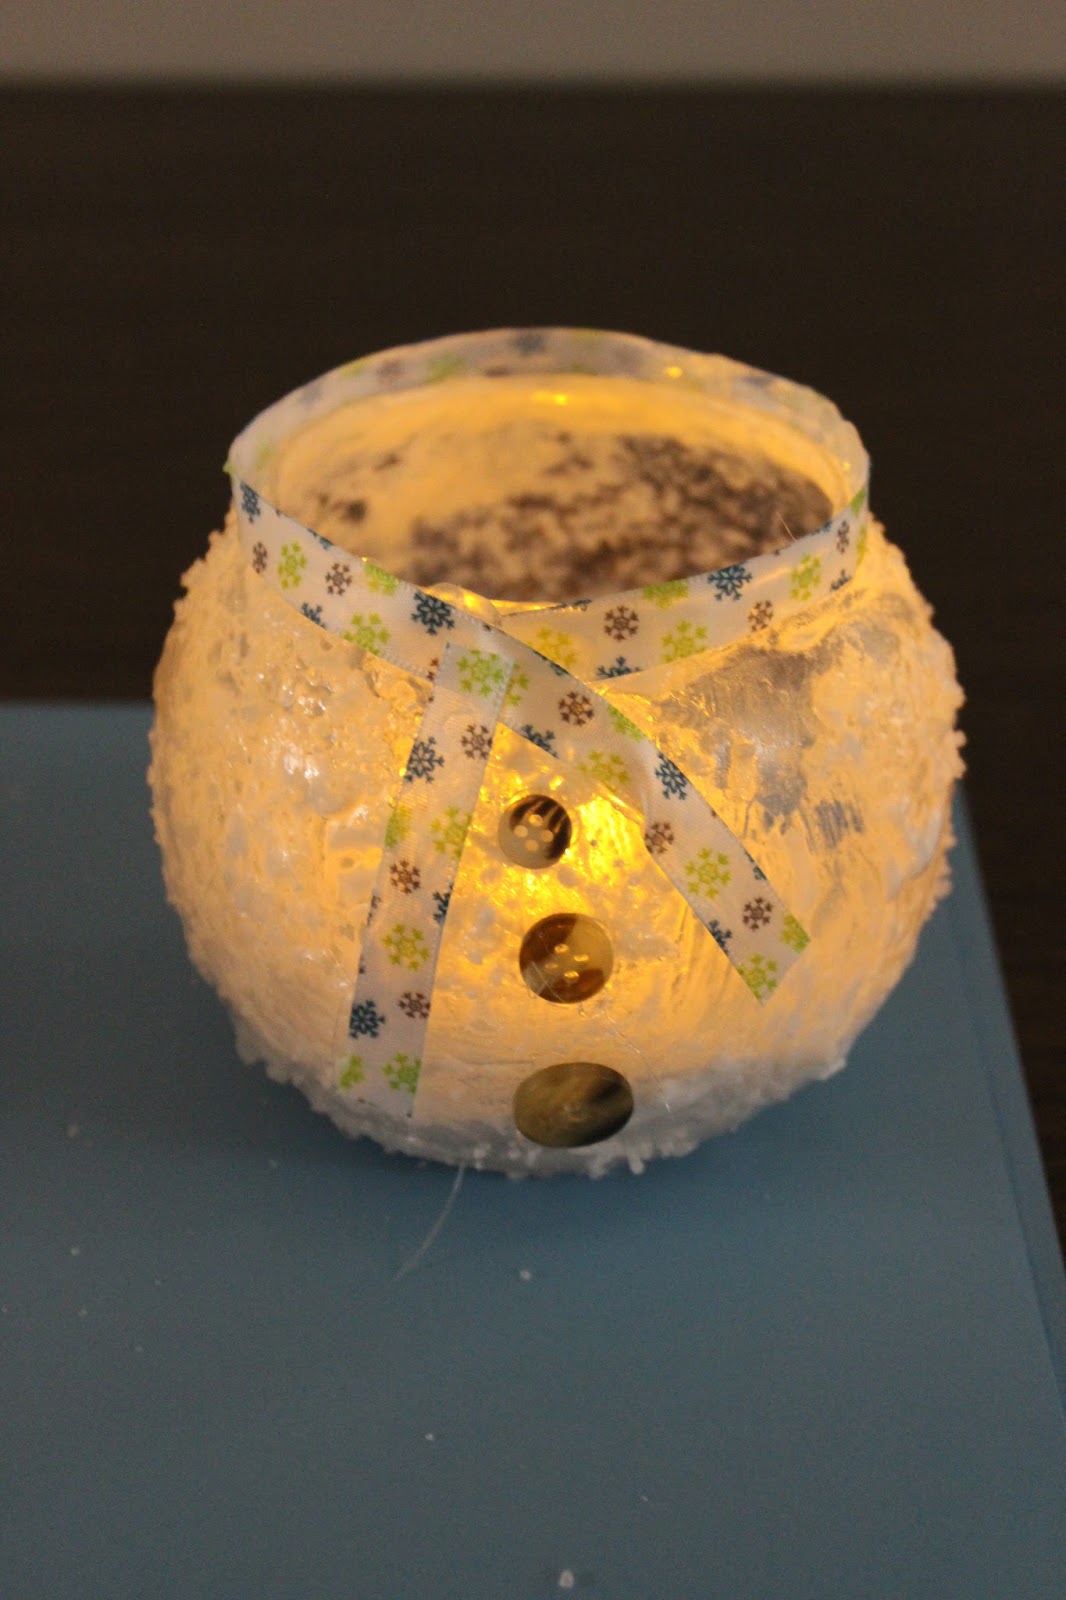
One of the crafts we did was a mason jar lantern- how Pinterest! We were going to join the big camp happening in another building on the site for campfire and they had all made lanterns to make the fire. I made a full Make it Monday post on the lanterns here.  


It has become almost a tradition in my unit to have "bacon and eggs" at camp- so delicious!  


This is my favourite photo from the weekend! 


Camp is the best place to get amazing photos and it was at those times that I wish we had a camp uniform or something that showed that we were at Girl Guide Camp. My mom suggested that we make toques for the girls by buying navy blue hats and a crest from the Guide shop. I am really happy with how they turned out because you can tell that they are a unit and it makes the pictures look awesome! :)  


This next craft needs a bit of a backstory. Last year at camp a few of the girls were afraid to go outside in the night because there  was a big tree right next to the building that would scrape on the window and make creepy shadows... They decided to make it a face and give it a name so it would be less scary and so Albert the Tree was born! All through last year and into this year the girls would constantly talk about Albert so when it came time for a patrol to plan an activity they wanted to make their own Albert the Trees. I was pretty impressed by how much they ran with the idea and the craft turned out pretty cute. 


Here is the original Albert the Tree! 


 Another one of the patrol activities was making cookies. They made two different kinds of cookies- traditional chocolate chip cookies and Dad's cookies with jam in the middle. They were both delicious! 


The girls planned chocolate fondue for their Saturday night dessert Heather had a marshmallow with her fondue and it looked like Ron Swanson from Parks and Recreation. What do you think?  


This is the Northern Lights in crayon form- pretty creative for a Sunday morning. 


As we were packing up from camp I came across this snowman, I have no idea who made it but I thought it was cute.  


One of my favourite activities at winter camp is making these ice suncatchers. I know I have mentioned it before but all you need to is collect some nature bits, put them in a tin pie plate filled with water, and leave it outside to freeze. When it is frozen, hang it in a tree and enjoy! When it melts everything goes back into nature and the small piece of yarn can be used by the birds. 

I had a really good time and I think the girls did to! What are your favourite winter camp activities?

Monday, January 4, 2016

Make it Monday: Snowman Candle Holder!


Happy New Year! This blog just turned five years old and although I have not always been consistent with posts (sorry!), I have really enjoyed writing and posting pictures on here! This year I hope I will be able to blog a lot more and I look forward to what is coming in 2016!

I think I have mentioned this before but I have been in Girl Guides for 20 years and I have done A LOT of crafts! In that time I have made so many things out of pipe cleaners and glitter glue that came home from my camp or meeting and went straight into the garbage. How many beaded butterflies do you need?! Anyways I have decided that the crafts I do (for the most part) with my Guides have to be: 1. Purposeful- the craft either taught something in the program or is functional
2. Aesthetically pleasing- who wants an ugly craft? 
and 3. are not made out of food- I will get into that another time. 


Keeping that criteria in mind we created these snowman lanterns at the last meeting of 2015. They were pretty straightforward to do and all of the girls (and their parents!) really liked how they turned out. I found this craft on Pinterest and I would highly recommend it as a wintery craft for Guides.

Supplies: 
Glass vase with a slight rim on the top
Mod Podge
A foam brush
Epsom salts
Thin ribbon to make a scarf
Buttons
Hot glue gun

Step One: Cover the vase with a pretty thick layer of Mod Podge and sprinkle the Epsom salts on the outside of the vase. This is VERY messy so I would highly recommend putting down newspaper to contain the mess. 


Step Two: Use a hot glue gun to attach a ribbon around the top of the vase and glue the buttons down the front.


Step Three: Put a flameless candle in the vase and enjoy your snowman candle holder! Overall this craft took about 45 minutes to complete. I couldn't decide which one to show you because they all turned out so well!